

Transfer Necktie Patterns to Create Dozens of Unique Custom Gifts
In this step-by-step guide, you’ll learn how to transfer a necktie pattern to other products using Zazzle’s online designer. We’ll start with a plum and copper floral tie and apply the design to a duffel bag where you’ll see how to add a personalized name tag. The tutorial includes screenshots documenting each action and click, but the process only takes a few minutes. A downloadable PDF guide is available at the bottom of this page. Browse the full collection of neckties, including our popular flag pattern designs at myties.net.
Transferring from Necktie to Duffel Bag

Step 1
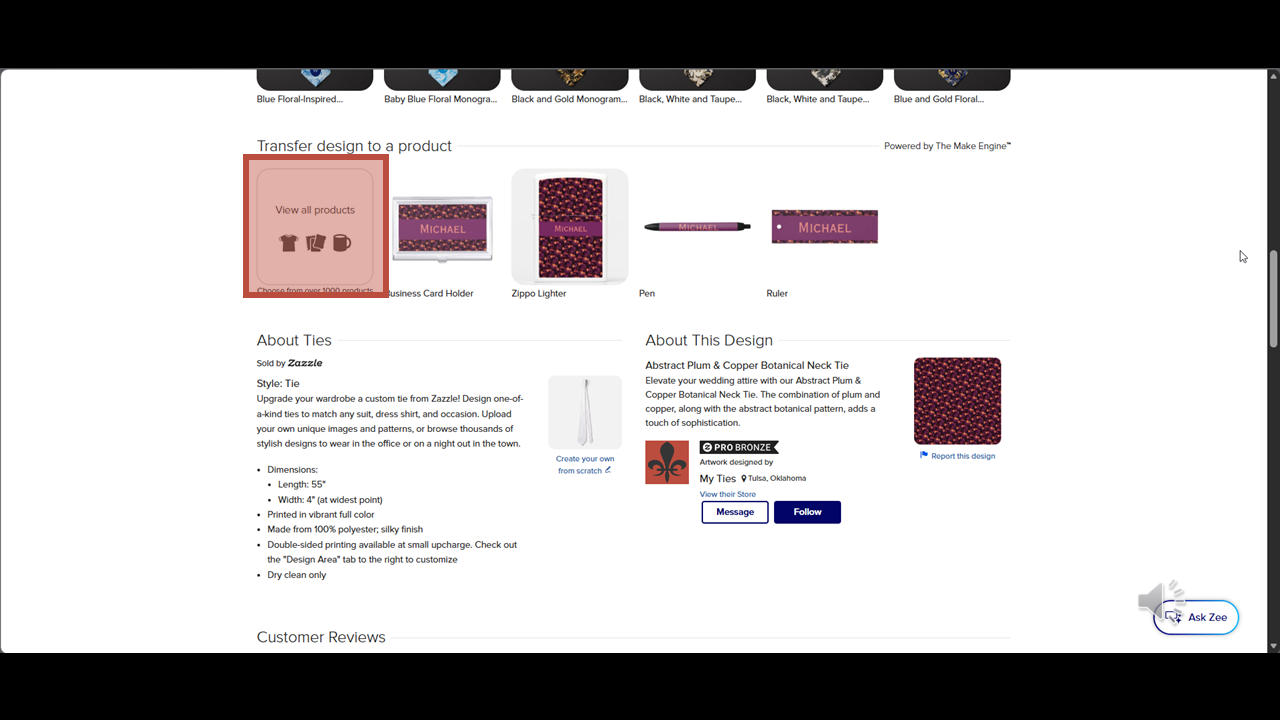
From the Zazzle product page scroll down until you see the "Transfer Design to a Product" section.
Step 2
Click on the View all products box.
Step 3
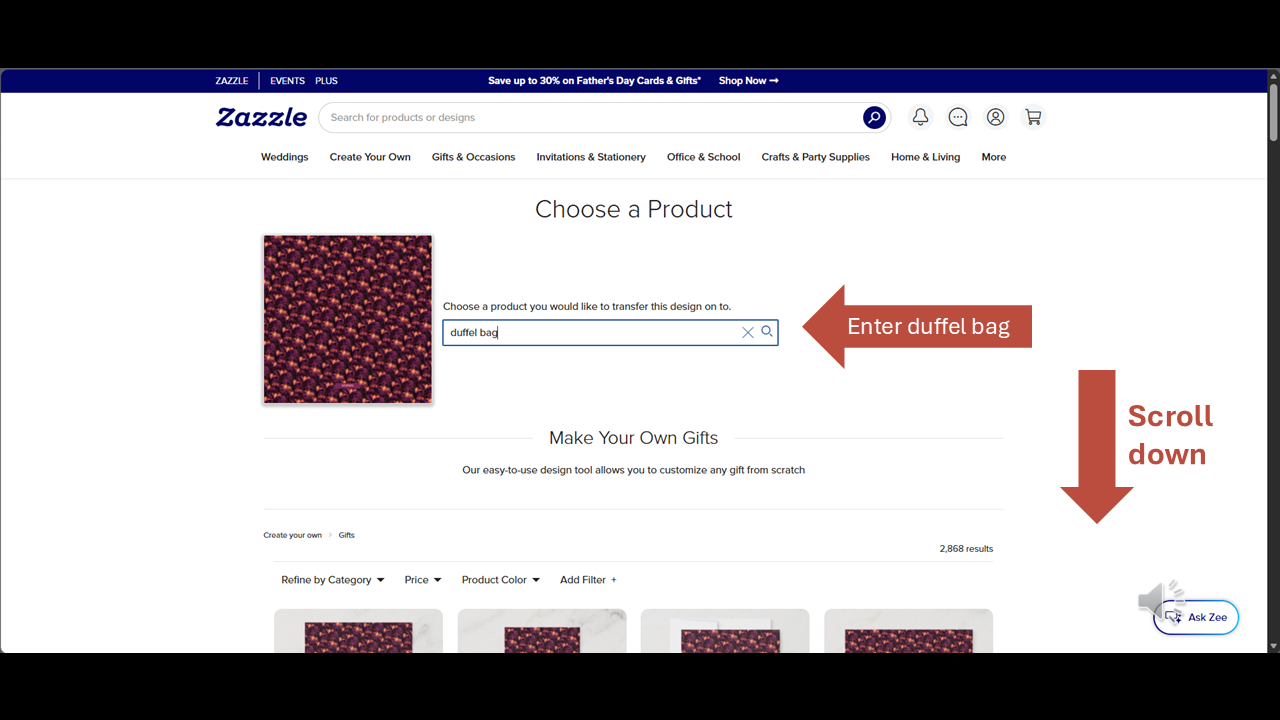
In the "Choose a product..." field, enter ‘duffel bag’, then scroll down to see the search results.
Step 4
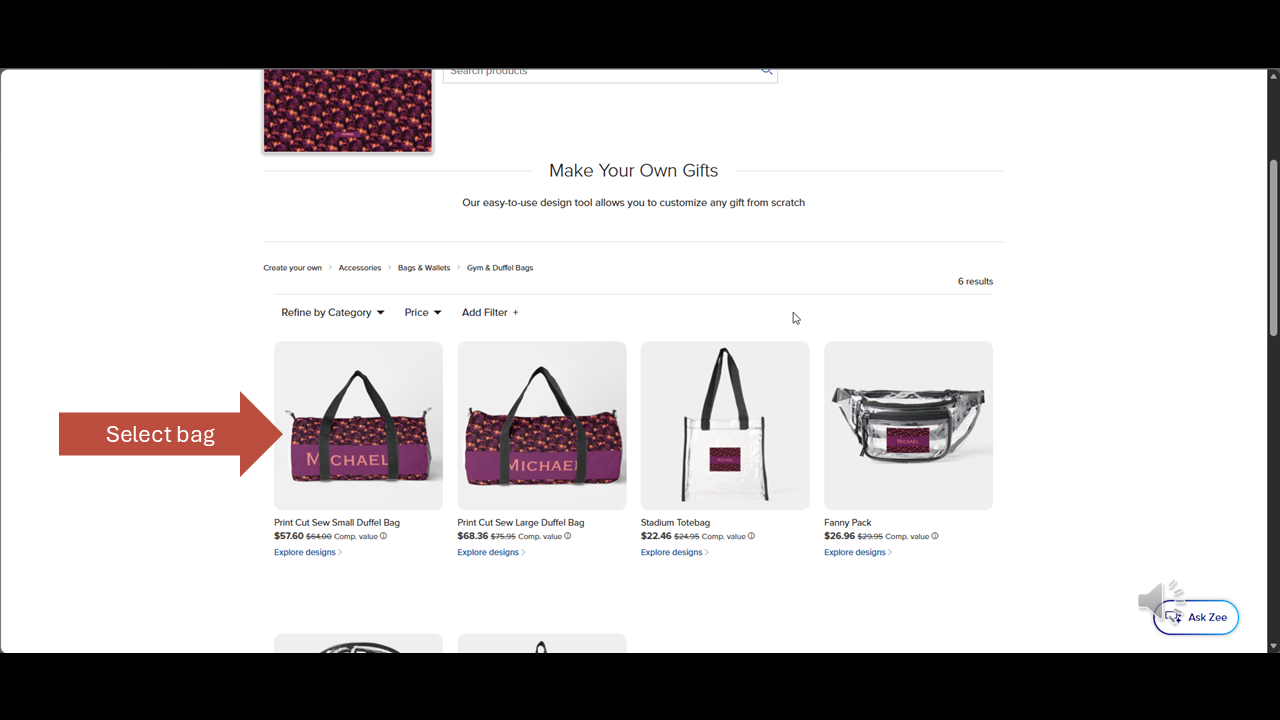
Select the picture of the small duffel bag.
Step 5
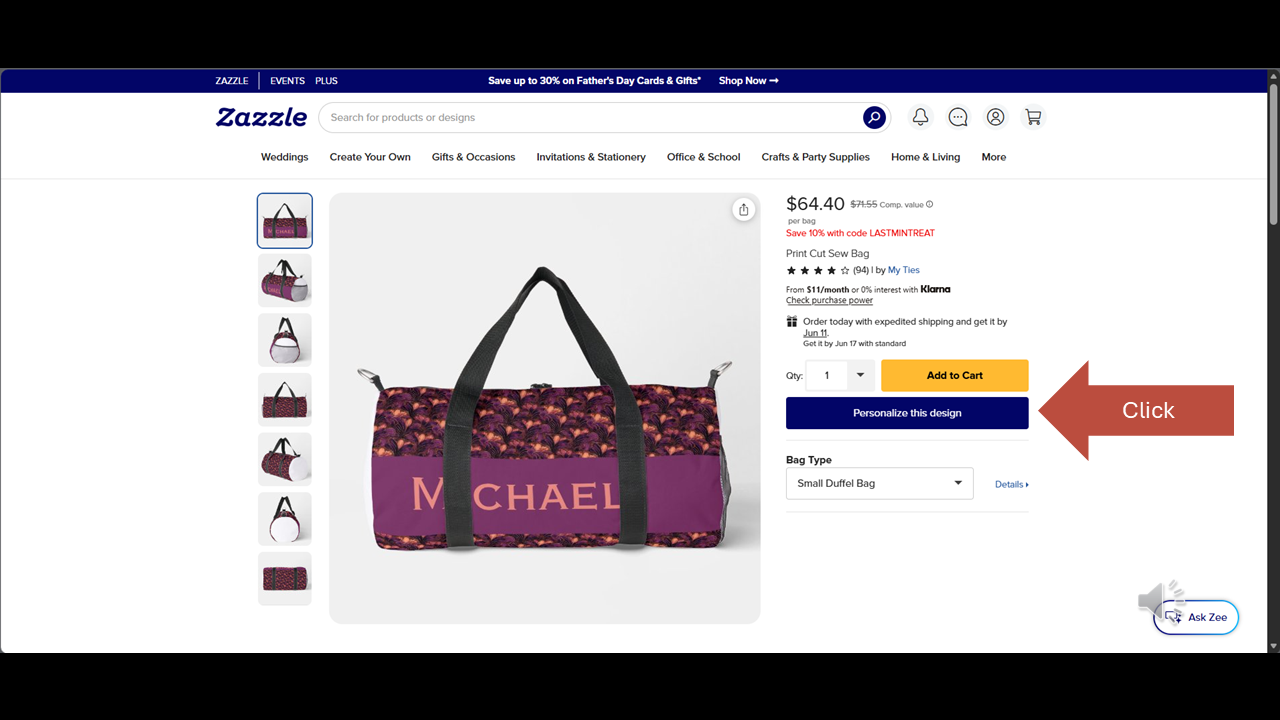
Now click on the blue "Personalize this Design" button.
Step 6
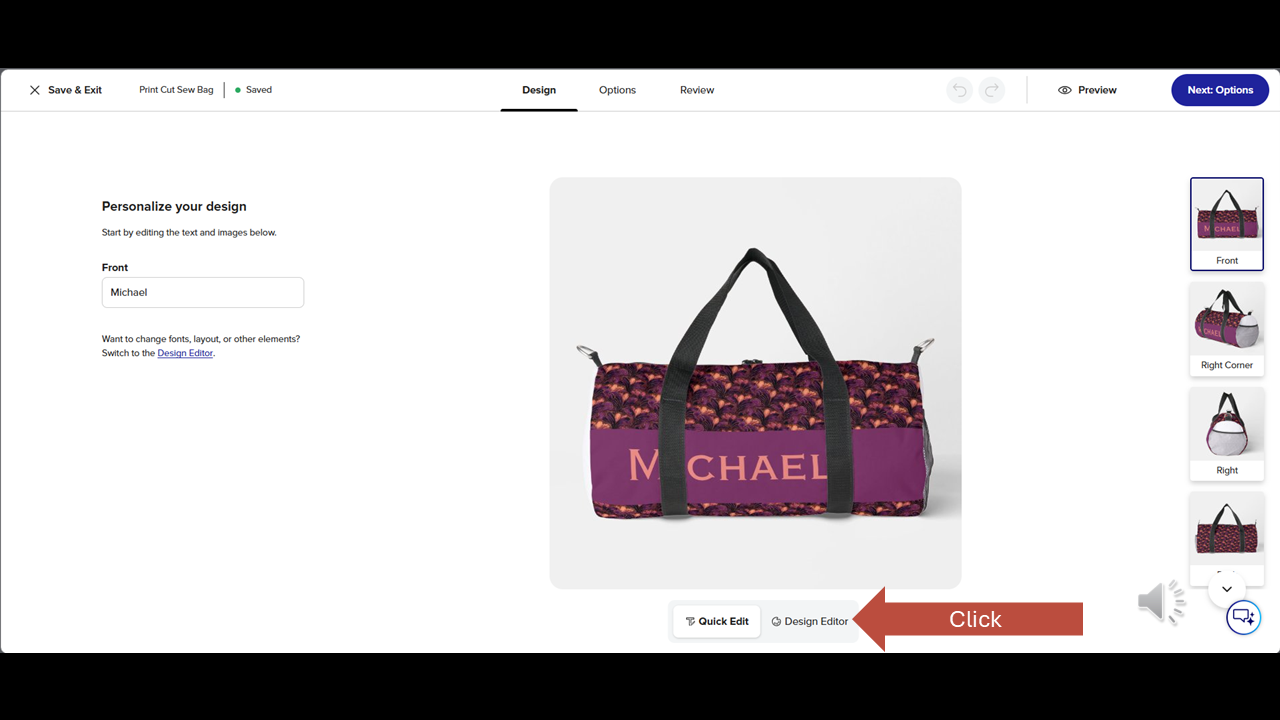
Inside the Zazzle Designer, below the picture, click on Design Editor.
Step 7
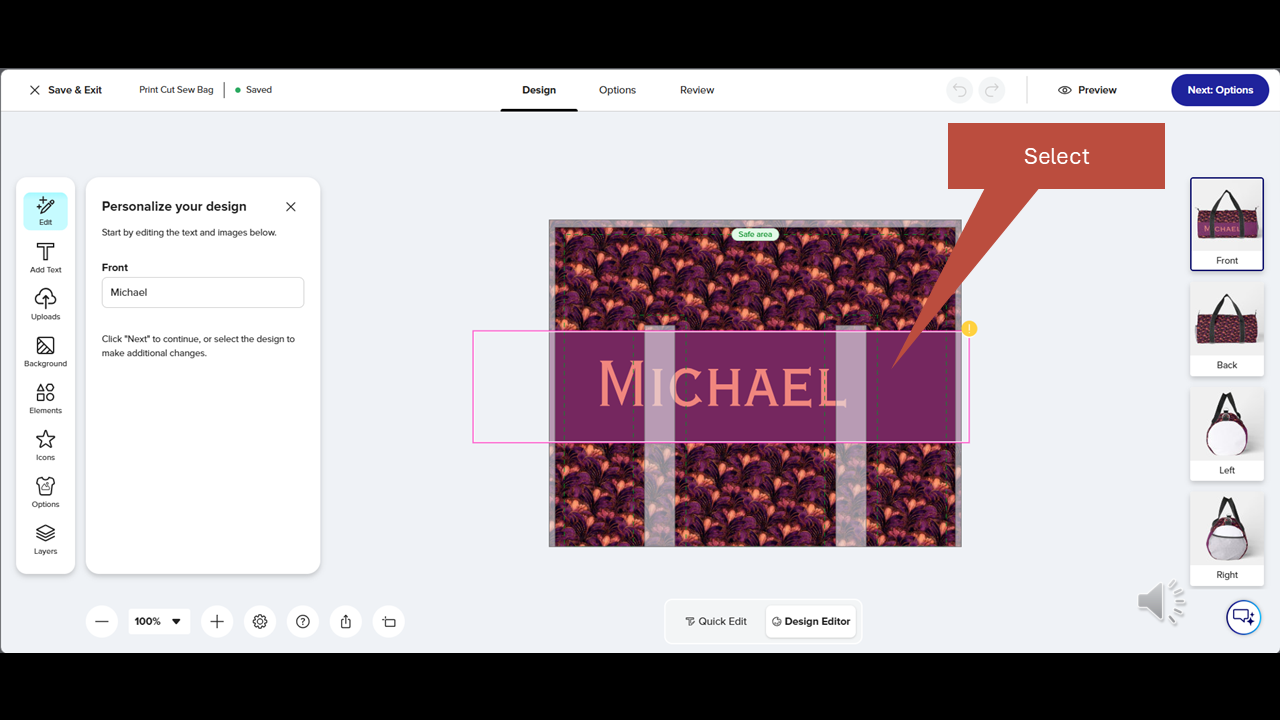
In many cases you may need to remove personalization artifacts from the necktie design. In this case the name band from the necktie has transferred over. Simply click on it…

Step 8
Right click and select Delete. If the text and background are not grouped together, you may need to delete them separately.
Alternatively you can select the items and click on the Trash Can icon in the upper menu.
Step 9
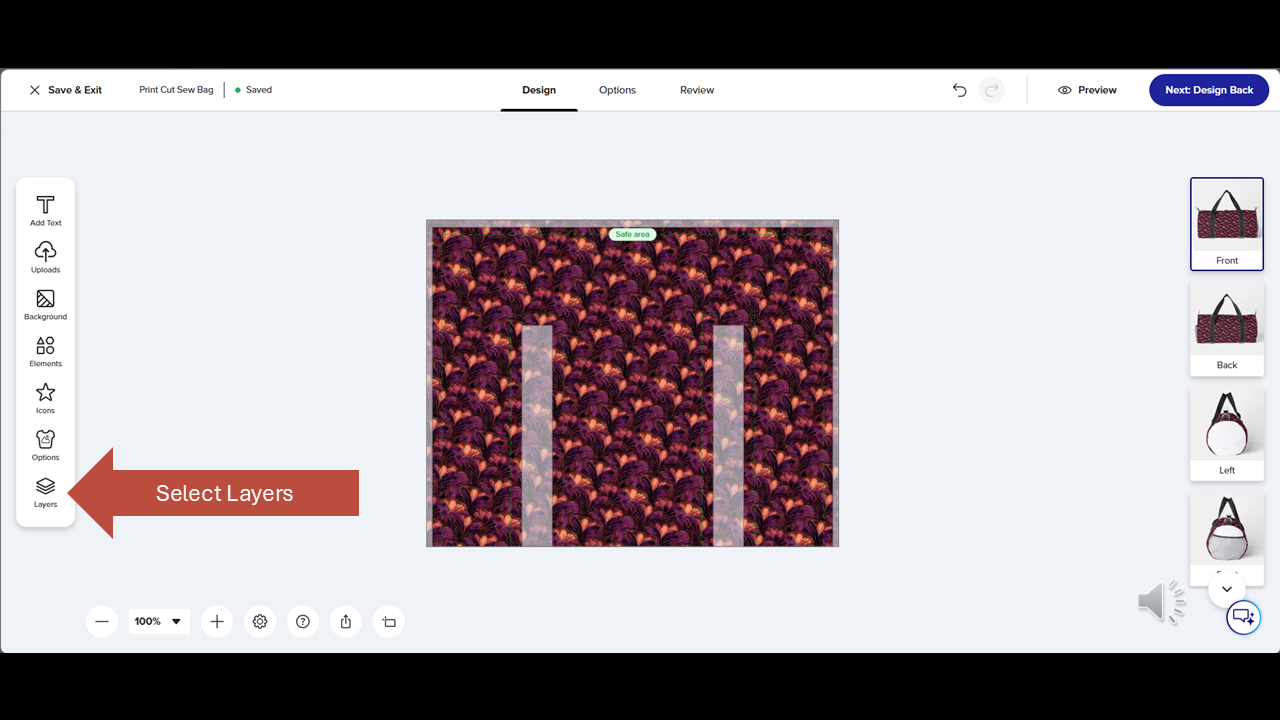
Now click on Layers in the Toolbox on the left-hand side.
Step 10
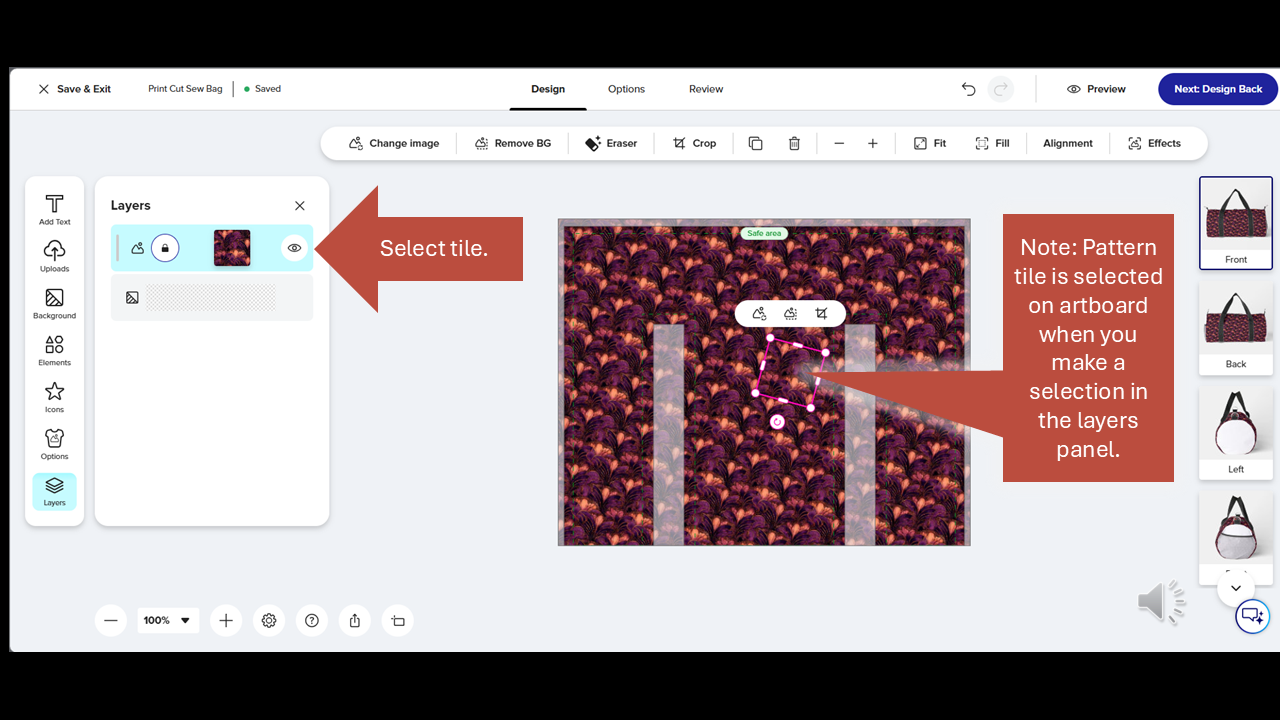
In the Layers panel select the Pattern tile. As you select the tile in the Layers panel, it will appear selected on the artboard as well.
You will also notice that the upper menu becomes activated when an item is selected.
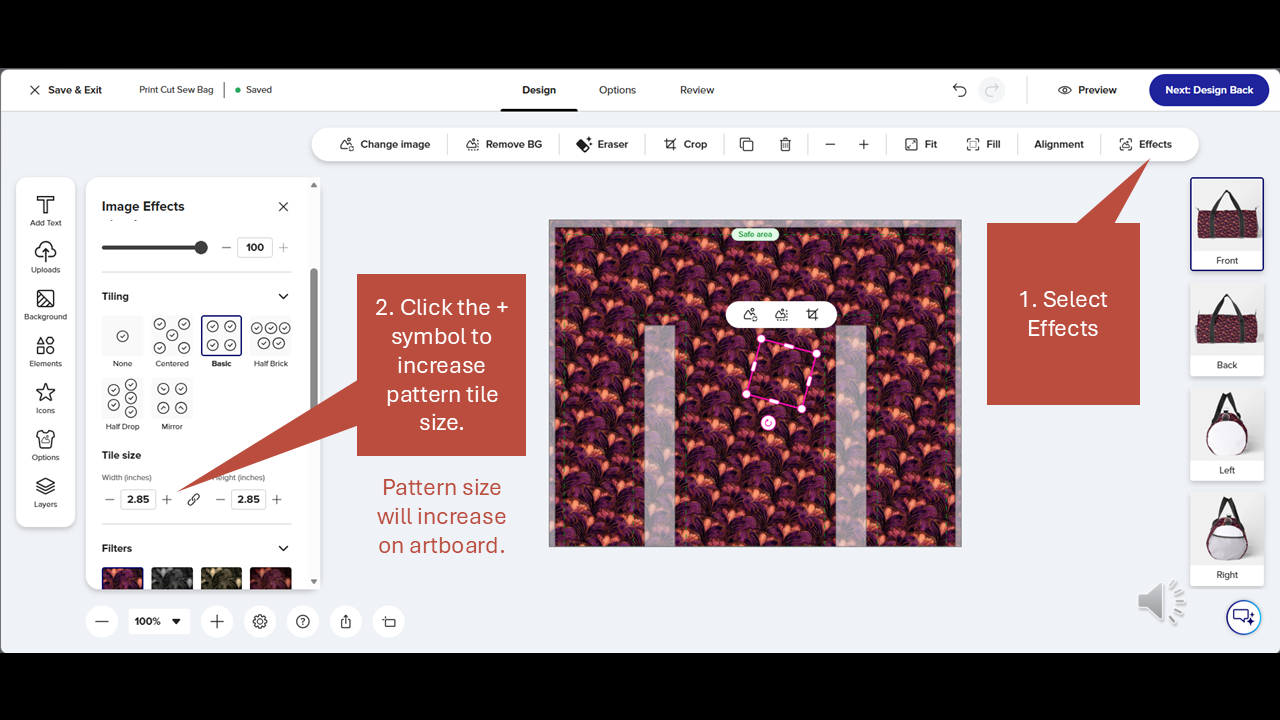
Step 11
In the upper toolbar click on Effects. In the Image Effects panel on the left, click on the plus symbol to increase pattern size (You may enter a custom amount in the numeral field if desired). The pattern size will increase on the art board.
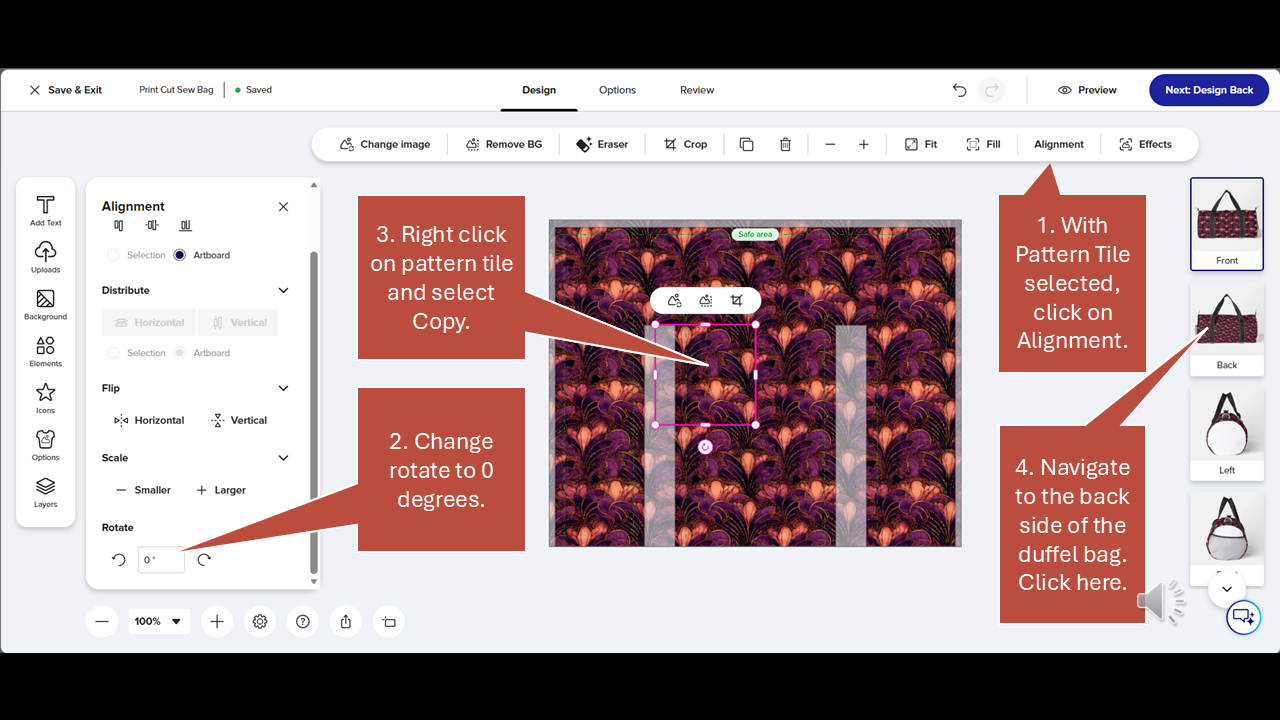
Step 12
This image may be a little confusing. Follow the steps in the order in which they are numbered and it will make sense. Make sure the pattern tile is selected on the artboard. Then click on Alignment in the upper toolbar. In the left panel change the Rotate setting to zero degrees. You'll notice the pattern changing on the artboard. Now we need to copy the revised pattern onto the other sides of the duffel bag. Right-click on the Pattern Tile on the artboard and select Copy. Then navigate to the backside of the duffel bag by clicking on the image labeled "back" on the right side of the screen.
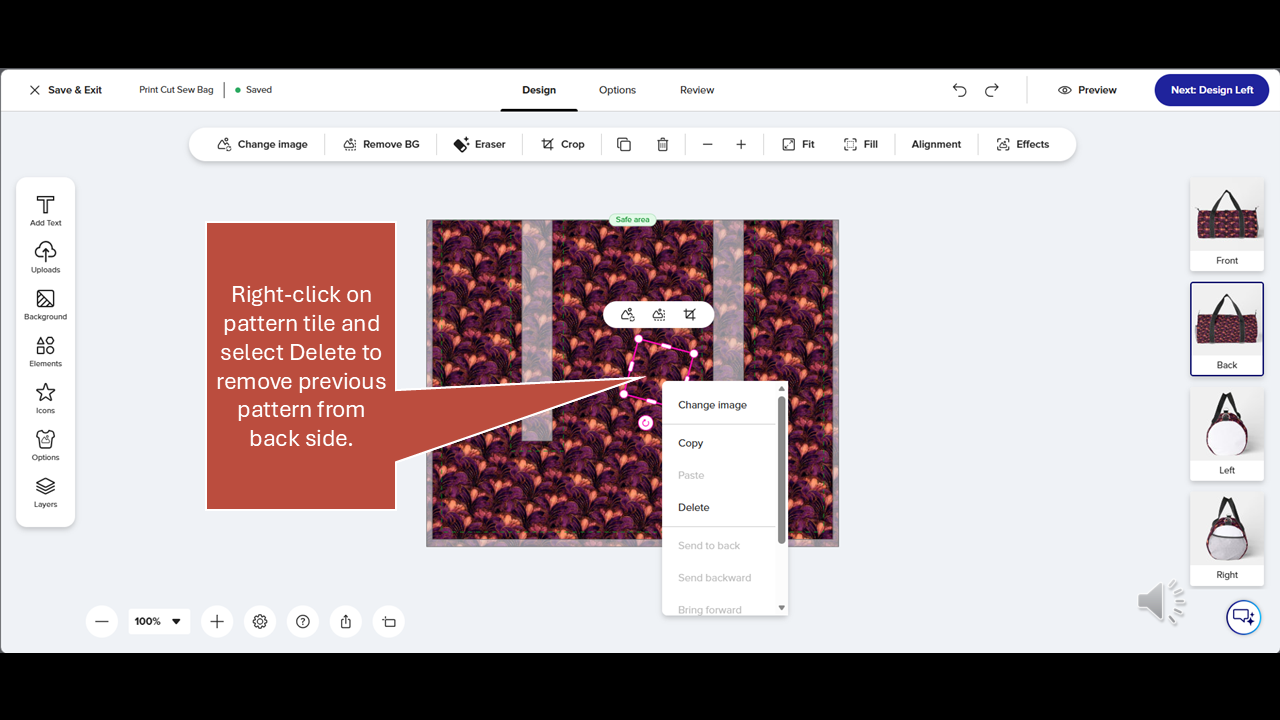
Step 13
On the back side, right-click on the pattern tile and select Delete to remove the previous pattern.
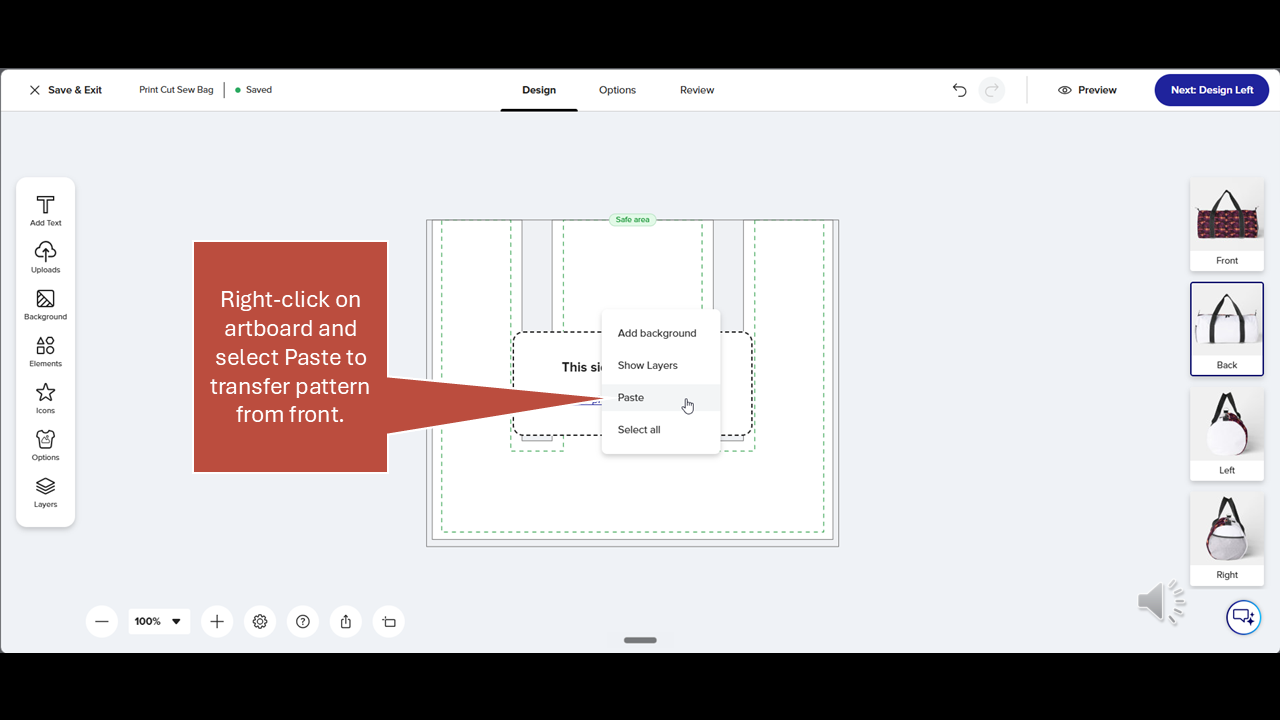
Step 14
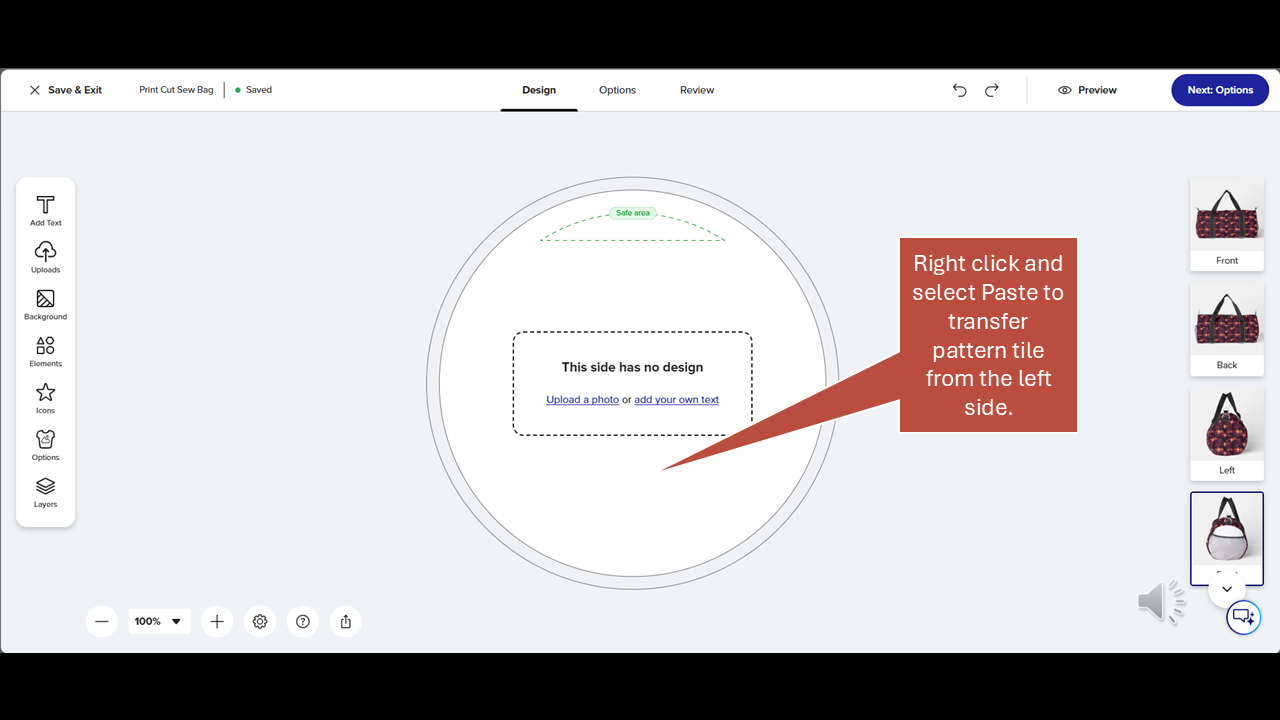
Right-click on the empty artboard and select Paste to transfer the pattern from the front side.
Step 15
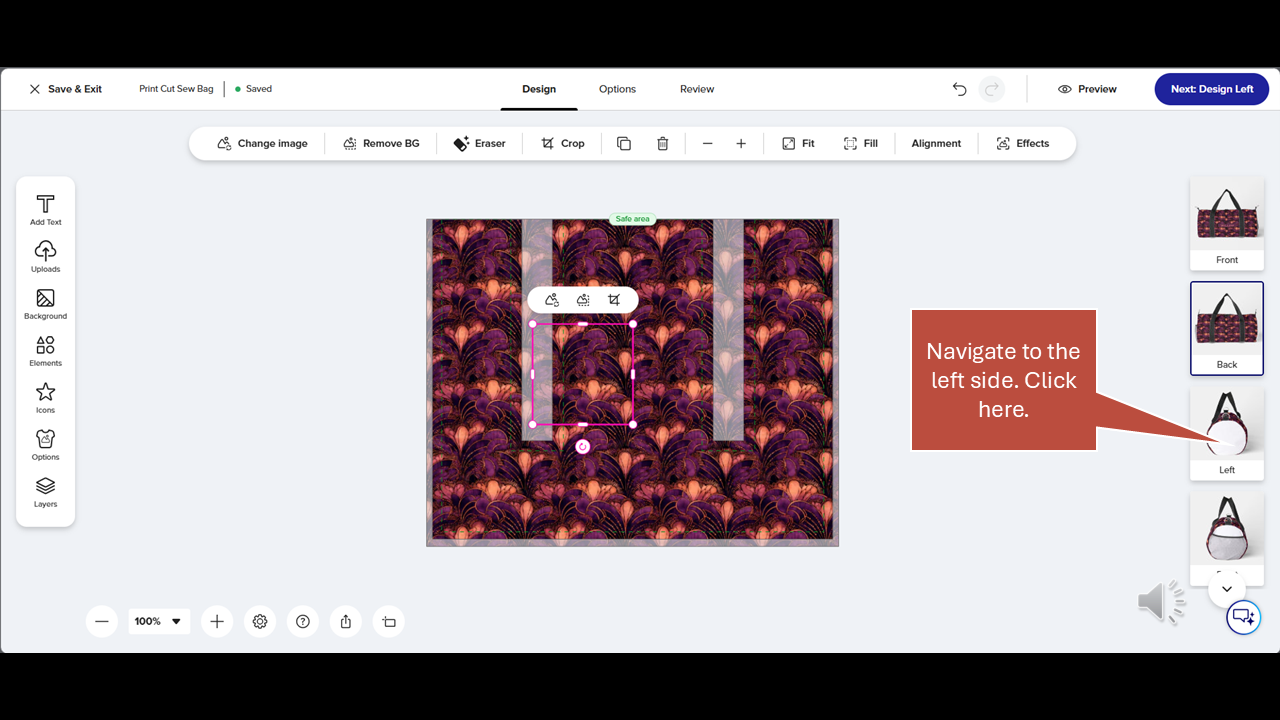
Navigate to the left side of the duffel bag by clicking on the picture located on the right side of the screen.
Step 16
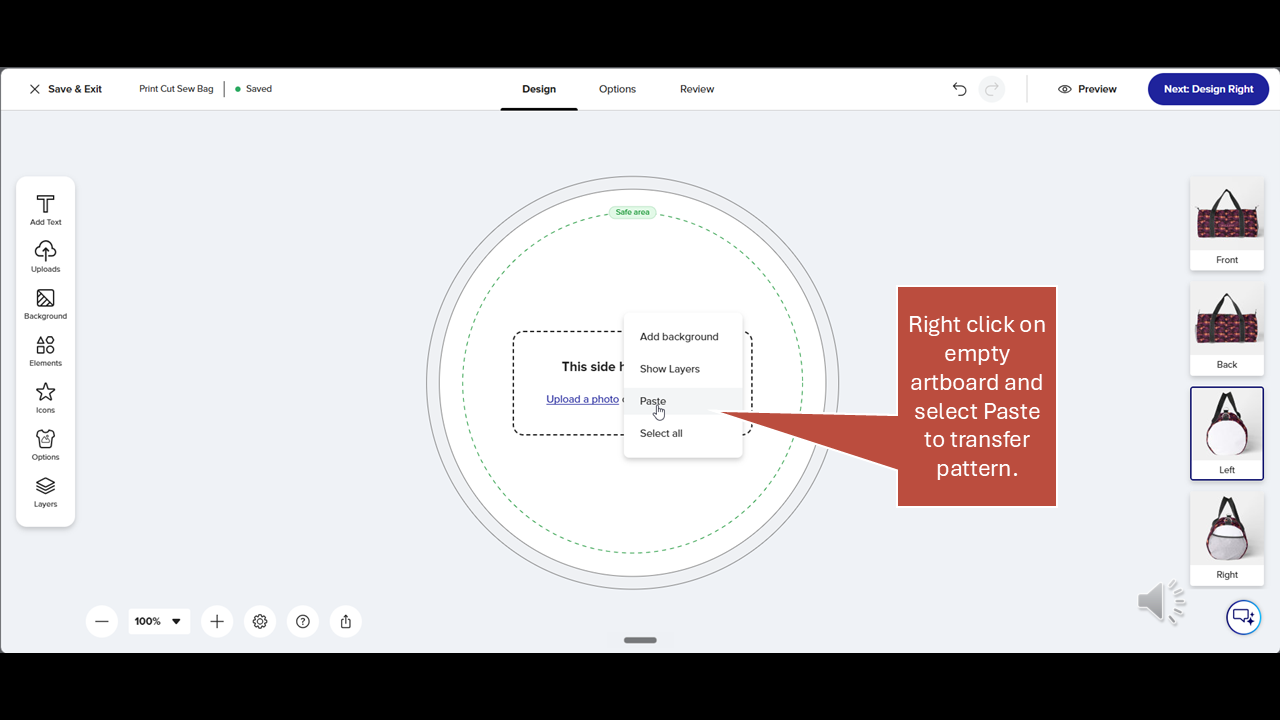
Right-click on the empty artboard and select Paste to transfer the pattern.
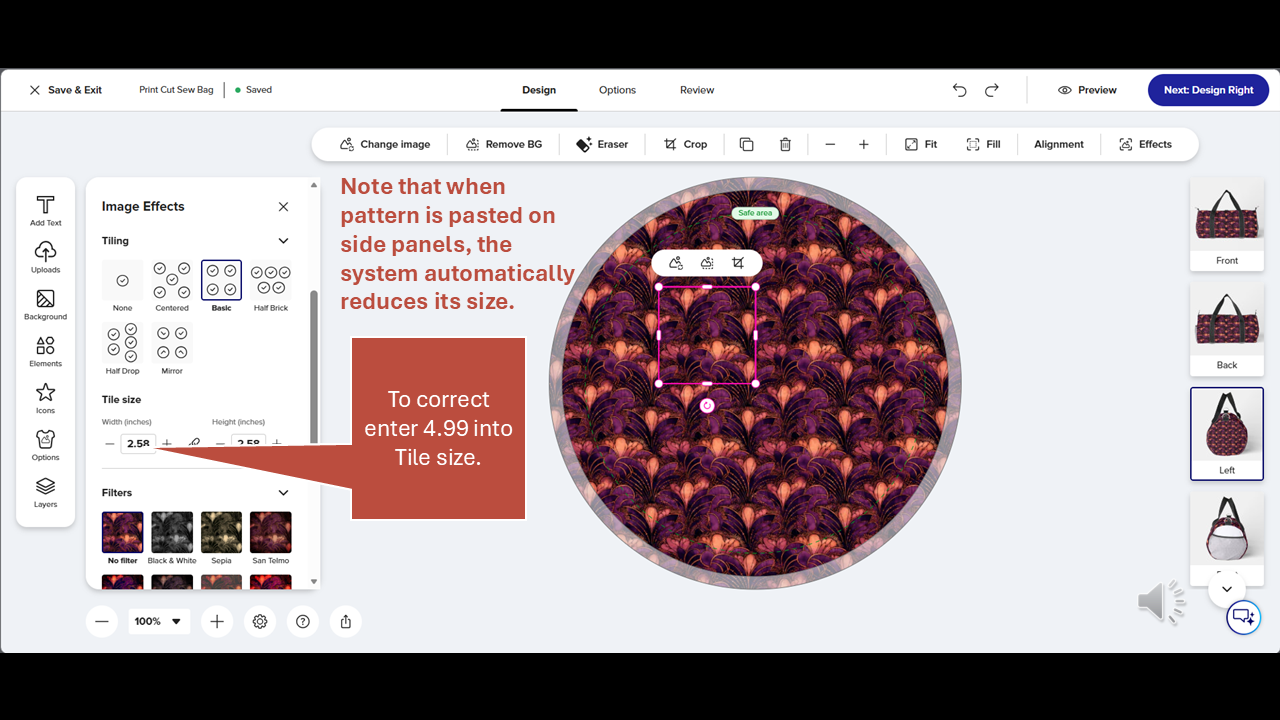
Step 17
When the pattern is pasted onto the side panels, the system automatically reduces its size. I'm not sure why this happens, but to correct it, enter 4.99 in the tile size so that it matches the other sides of the duffel bag. Always check your pattern sizes when copying and pasting them.
Step 18
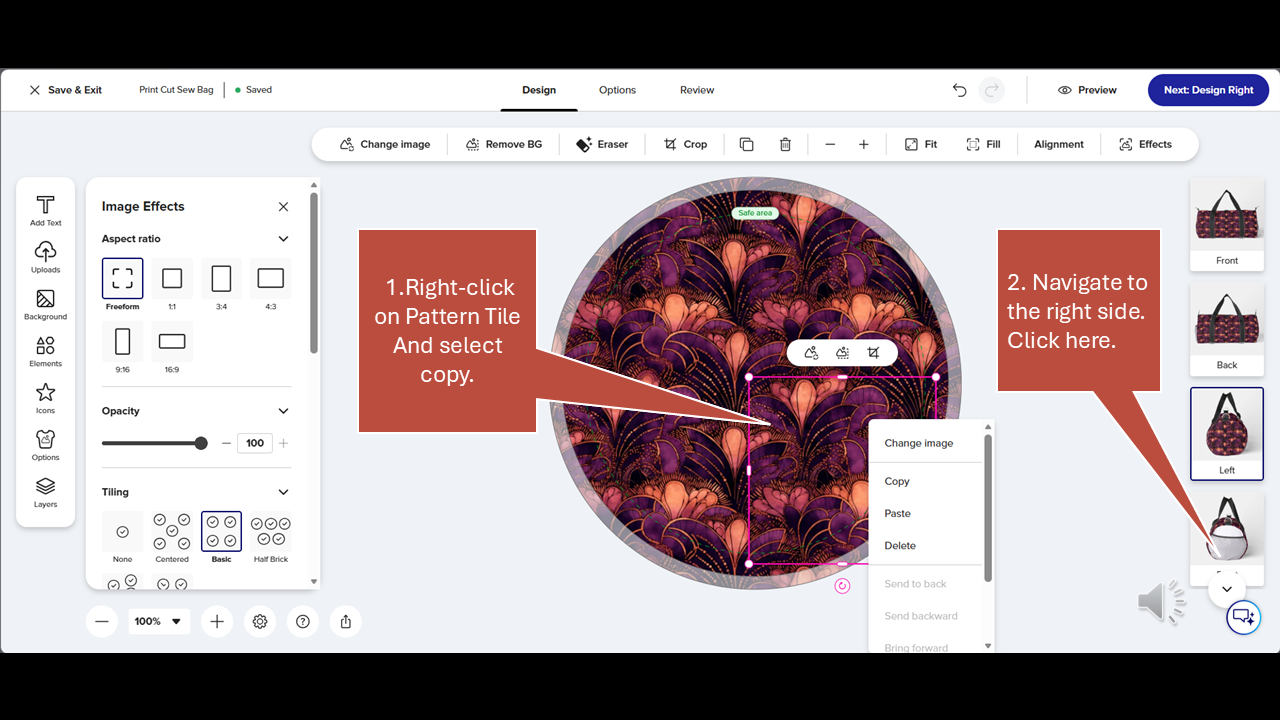
Next, right click on the pattern tile on the art board and select Copy. Then navigate to the right side of the duffel bag by clicking on the image on the right side of the screen.
Step 19
Right-click on the empty artboard select Paste to transfer the pattern tile from the left side.
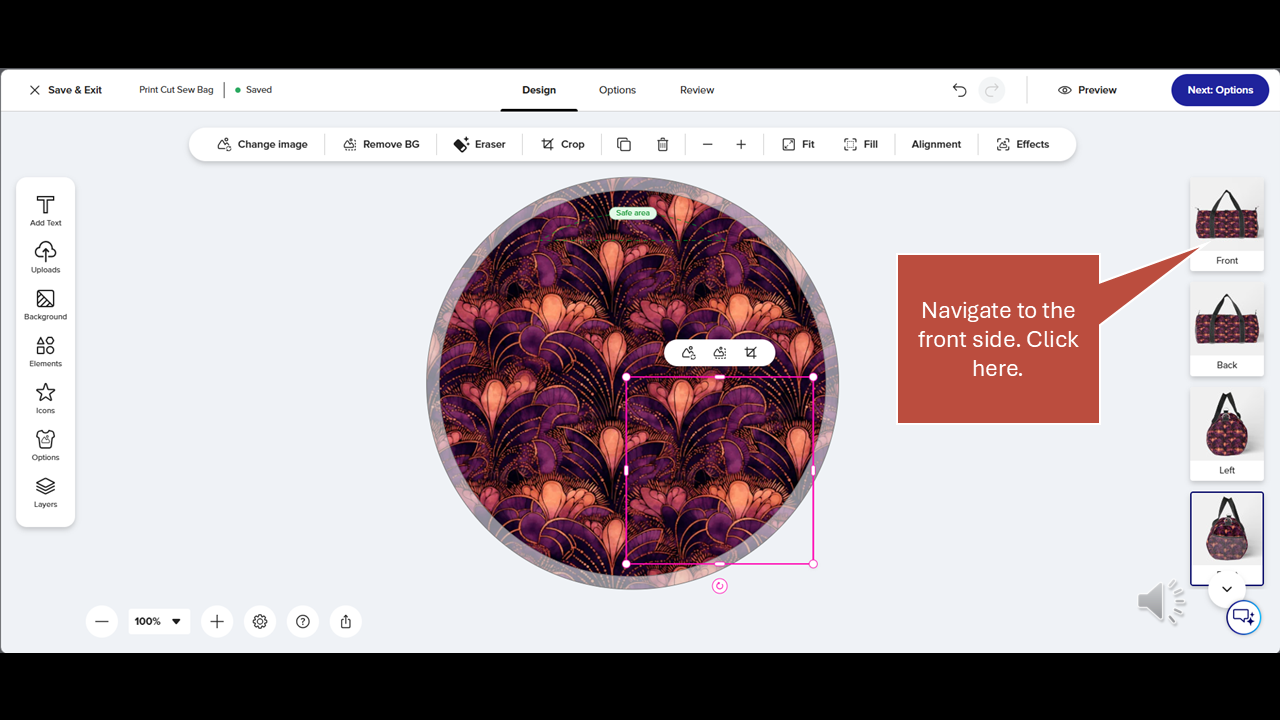
Step 20
Click the front image on the right side of the screen to navigate back to the front side of the duffel bag.
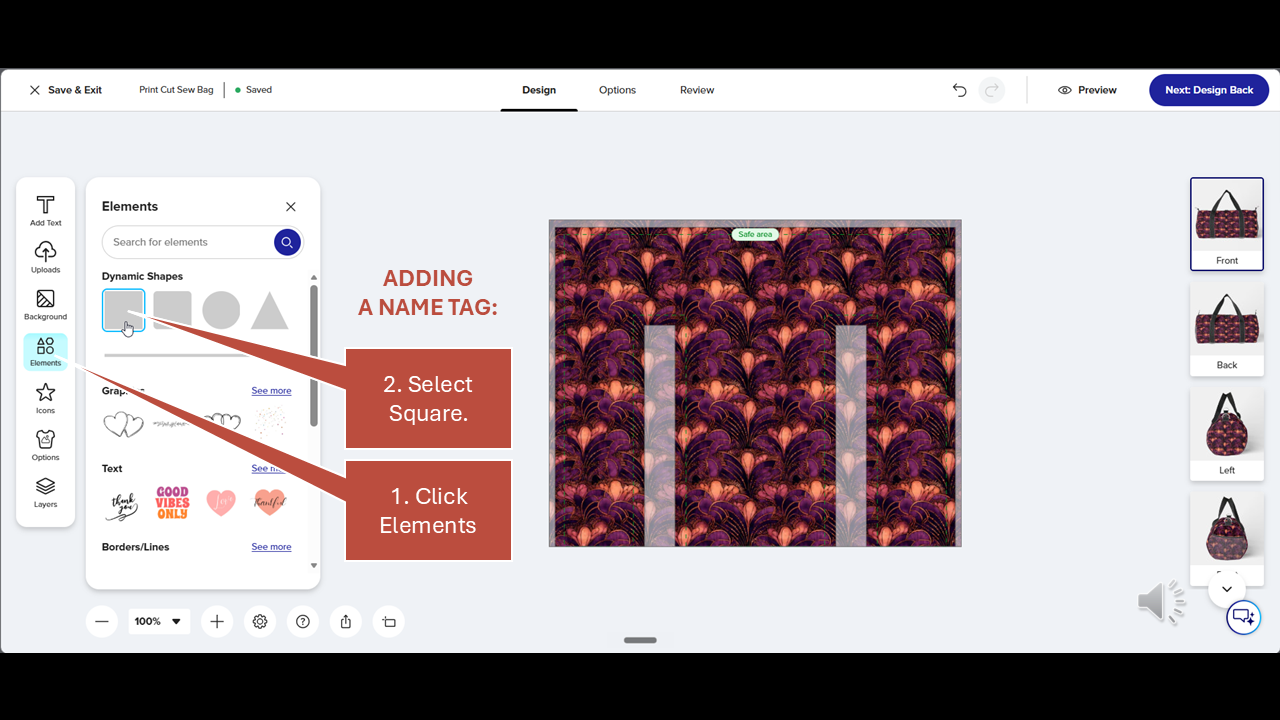
Step 21
To personalize the duffel bag with a name tag, begin by clicking the elements icon in the toolbox on the left. This will display elements in the left panel. Select the square under Dynamic Shapes in the Elements panel.
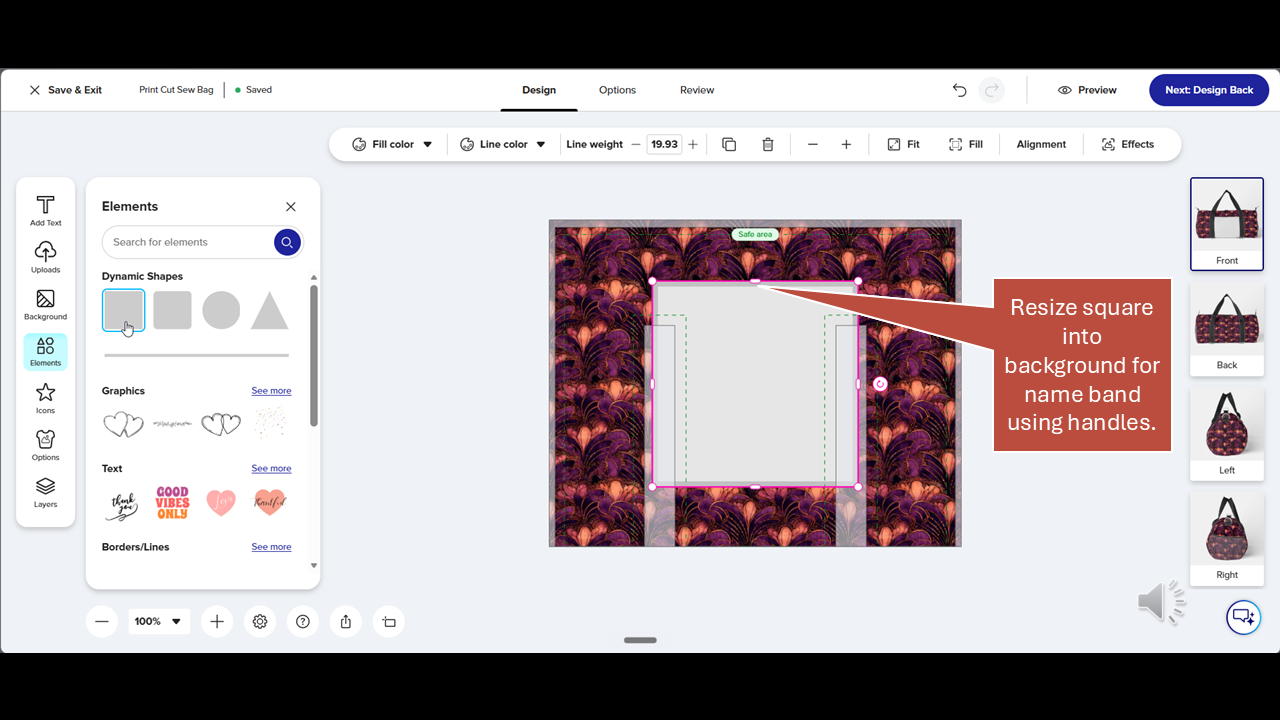
Step 22
A large square will appear on the artboard. Resize the square into a background for the name tag using the handles on its sides. Just click and drag to adjust it.
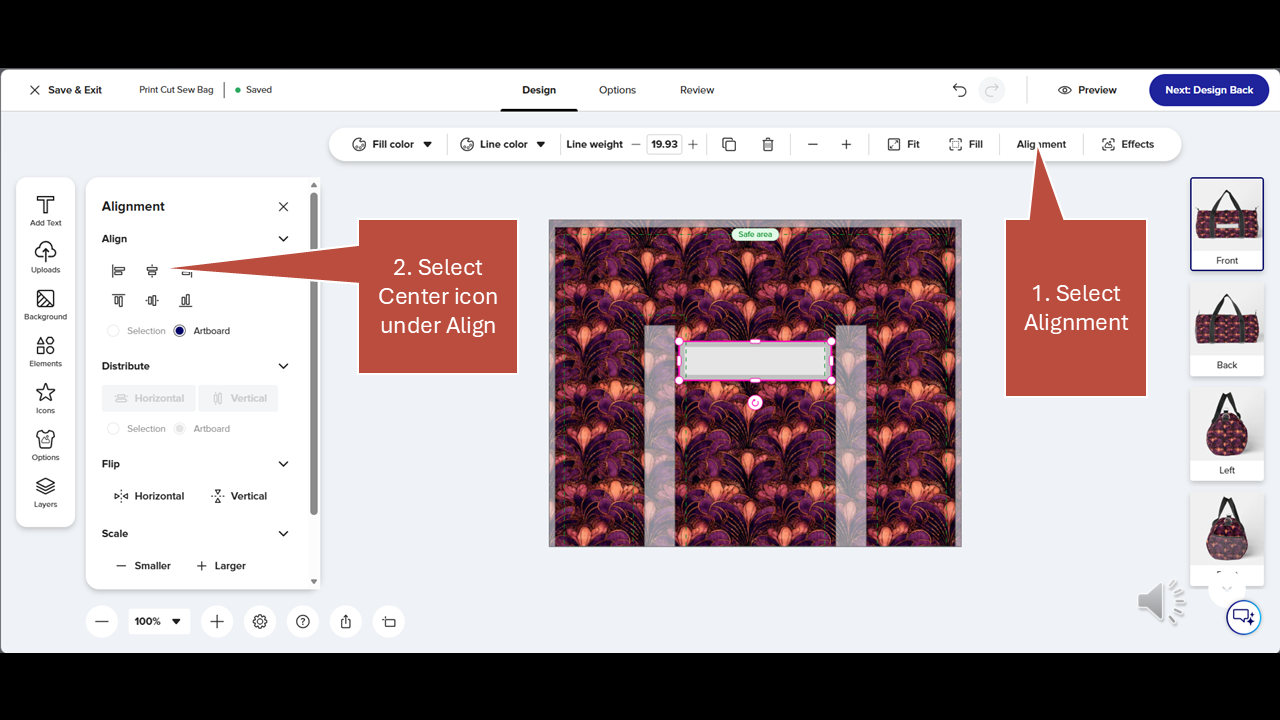
Step 23
With the name tag background selected, click on Alignment in the upper menu and then select the Center icon under Align in the panel.

Step 24
Format the Name Tag using options available in the upper menu. Select Fill Color using the Original Color Palette (which the system automatically generates based on colors in the pattern).
Select Line Color and adjust the Line Weight. All formatting options are in the upper menu while the Name Tag background is selected on the artboard.

Step 25
To add a name, click on the Add Text icon in the toolbox on the left. Then click the blue Add a Text Box button in the left panel . Now enter a name in the text field that appears over the art board and click Submit.
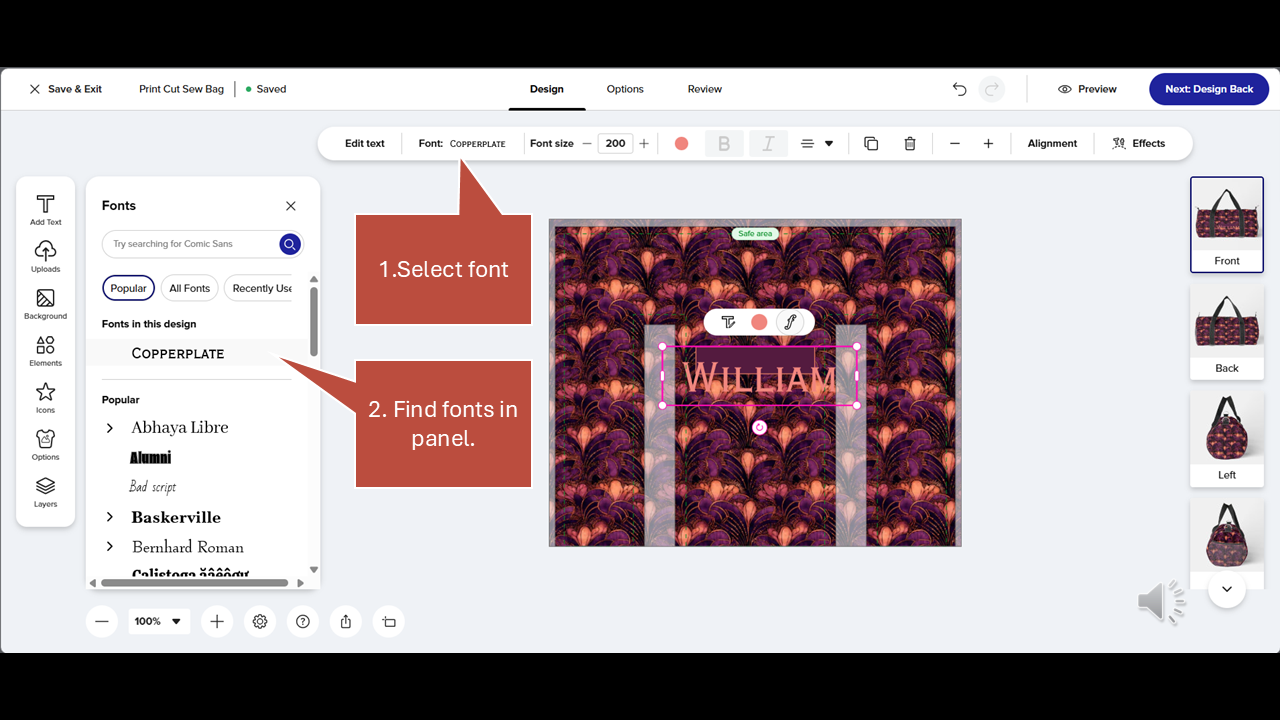
Step 26
To change or select fonts, click on Font in the top menu. Then search or select from the font list in the font panel on the left side.
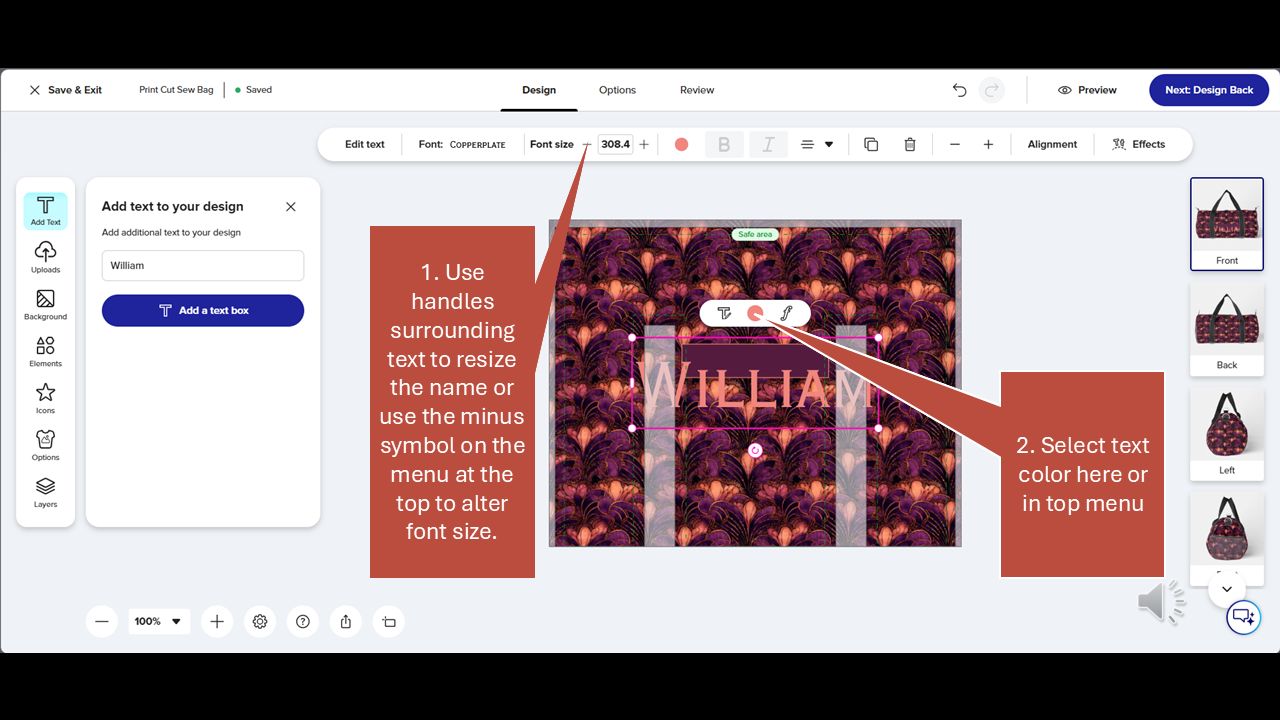
Step 27
To resize the text, you can click and drag the handles surrounding the type on the artboard, or you can enter a Type Size in the upper menu. You can also use the plus and minus symbols next to the font size to adjust by clicking. Next, select the text color in the floating menu above the text or in the upper text menu. Click the color dot on those menus to display the color options.
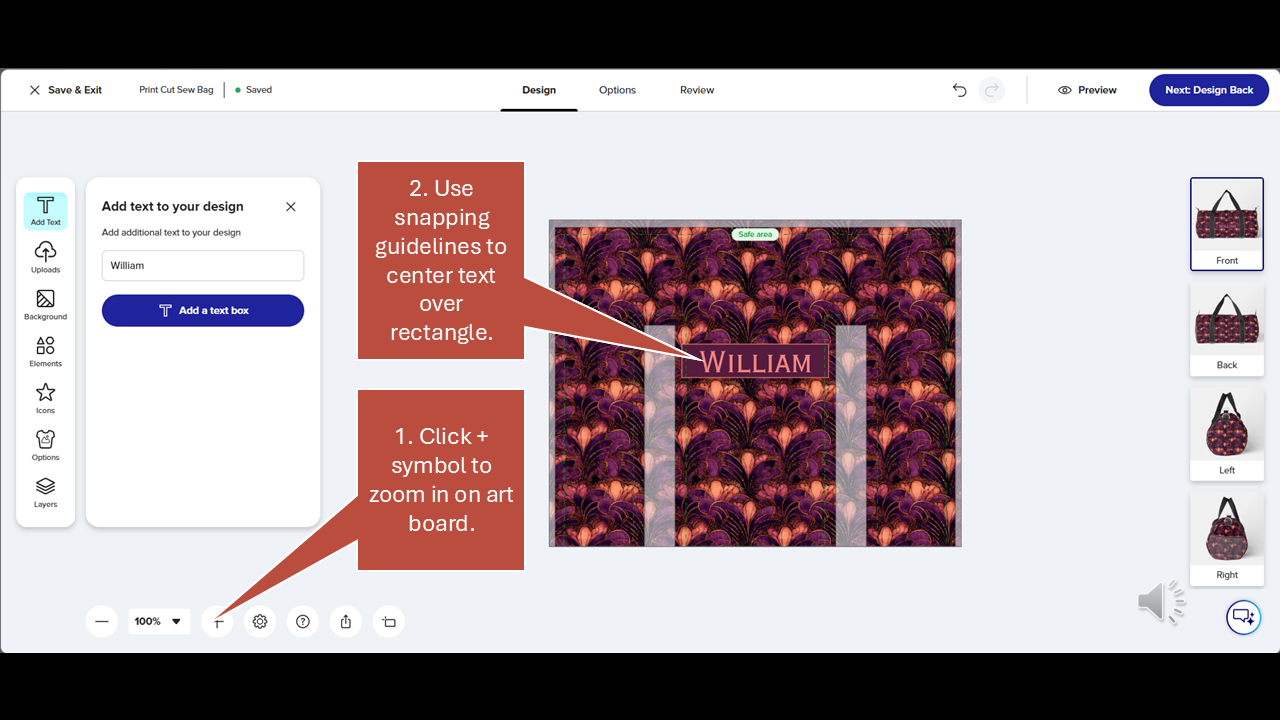
Step 28
Use the controller at the bottom of the screen to increase magnification on the artboard, click the plus symbol several times. Then, click and drag the name over the background using snapping guidelines to center the text within the rectangle.
Step 29
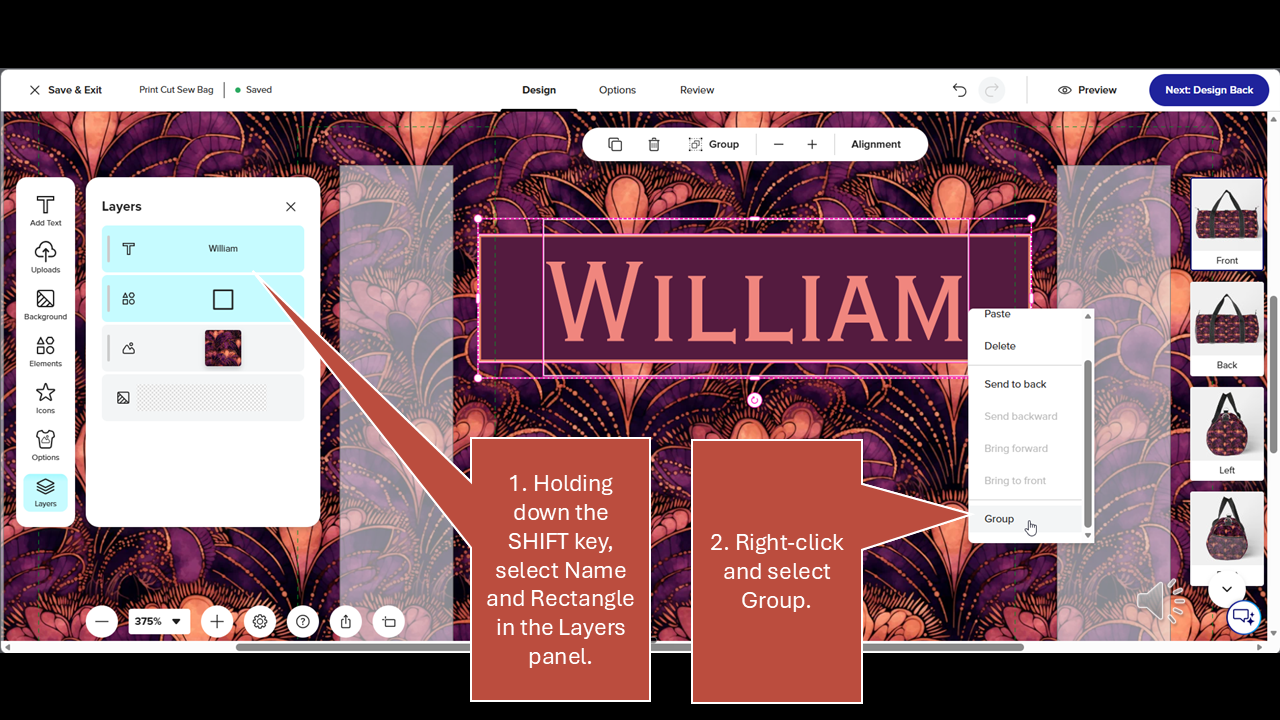
In the Layers panel, while holding down the Shift key, select the name and the background elements. Hover the mouse over the artboard, right click and select Group.
Step 30
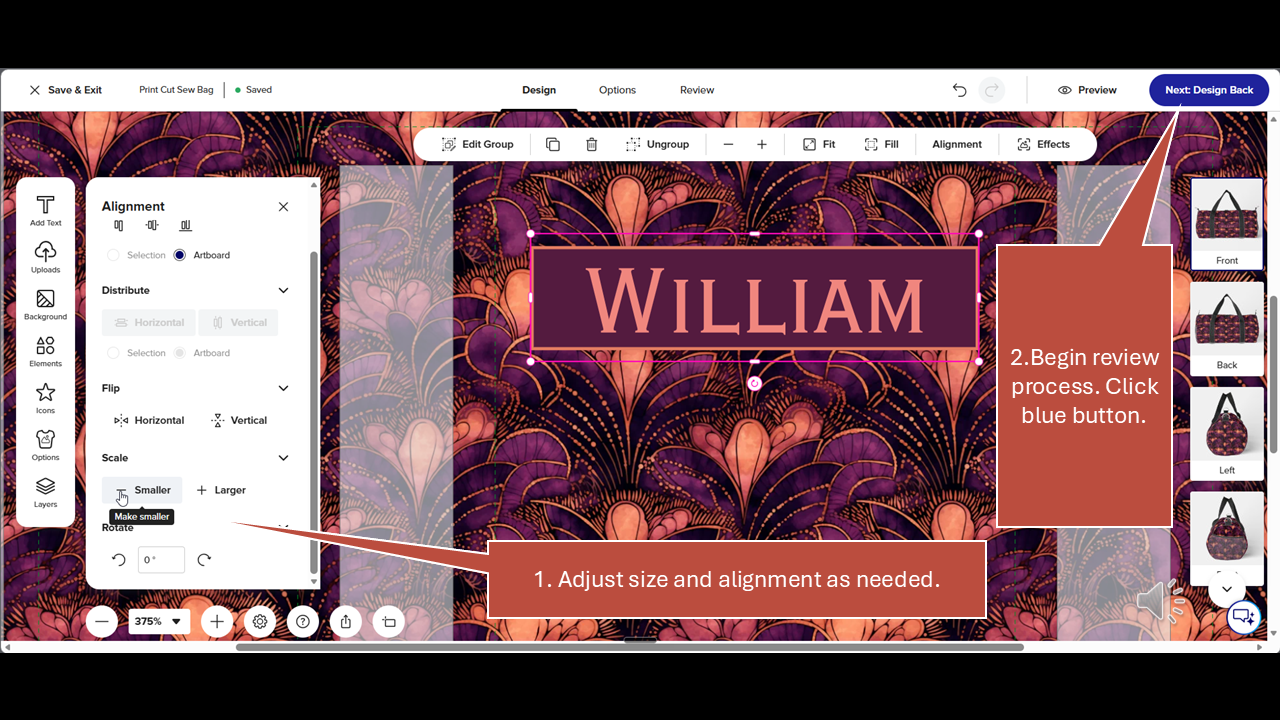
If needed, you can now adjust the size and the alignment of the grouped name tag using options in the Alignment panel. Once that's done, click the blue button labeled "Next Design Back" to begin the final review of your design. This is the first in a series of checks that will walk you through each side of the duffel bag and present previews for you to check prior to ordering.
Step 31
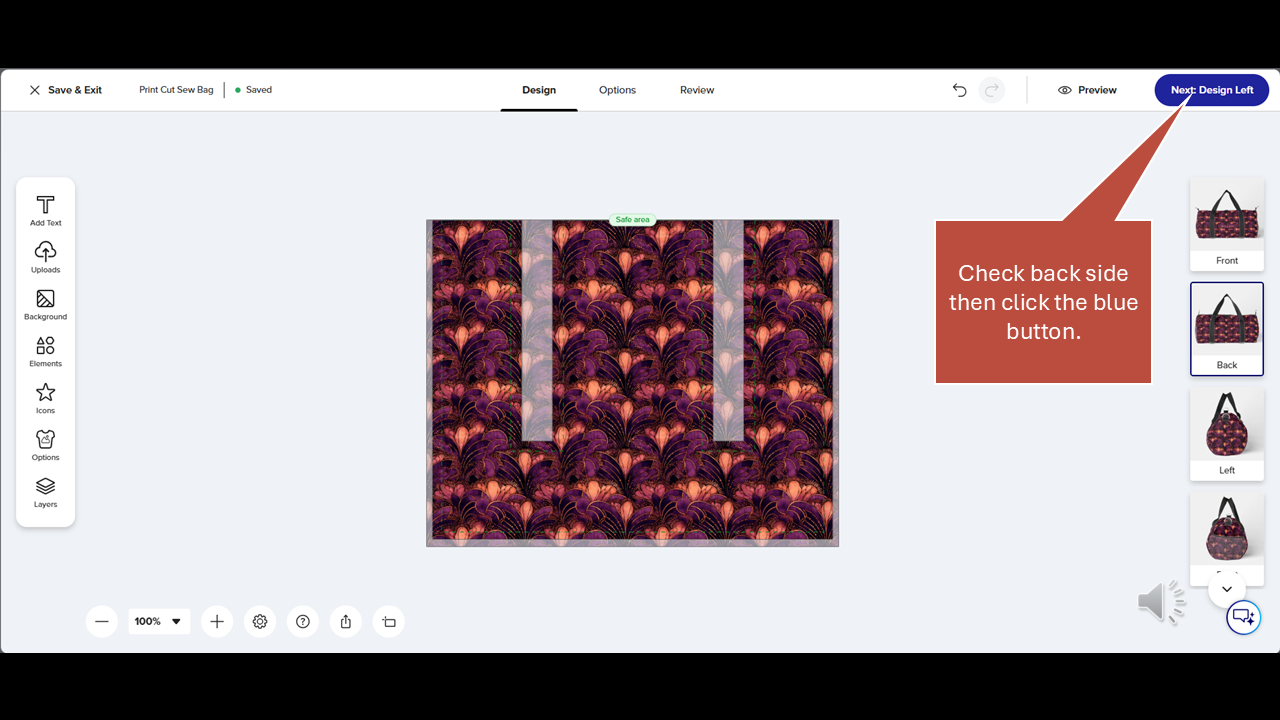
Check the back side then click the blue button again.
Step 32
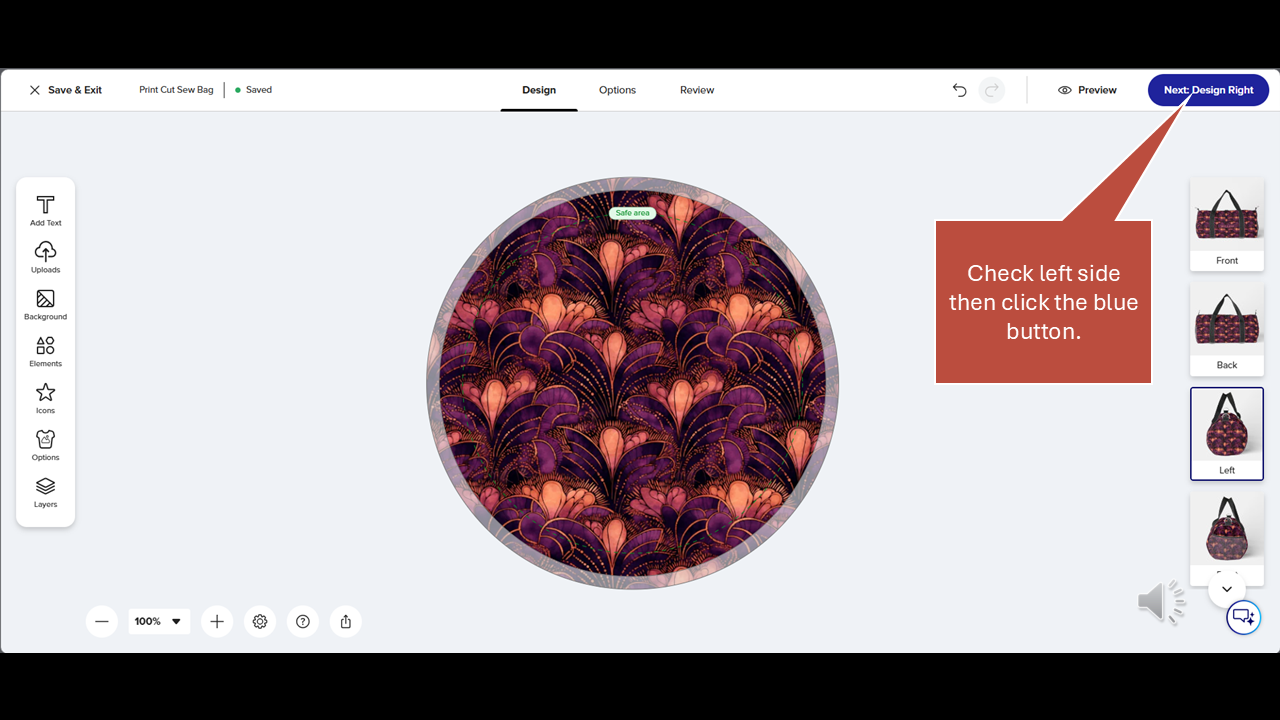
Check the left side then click the blue button again.
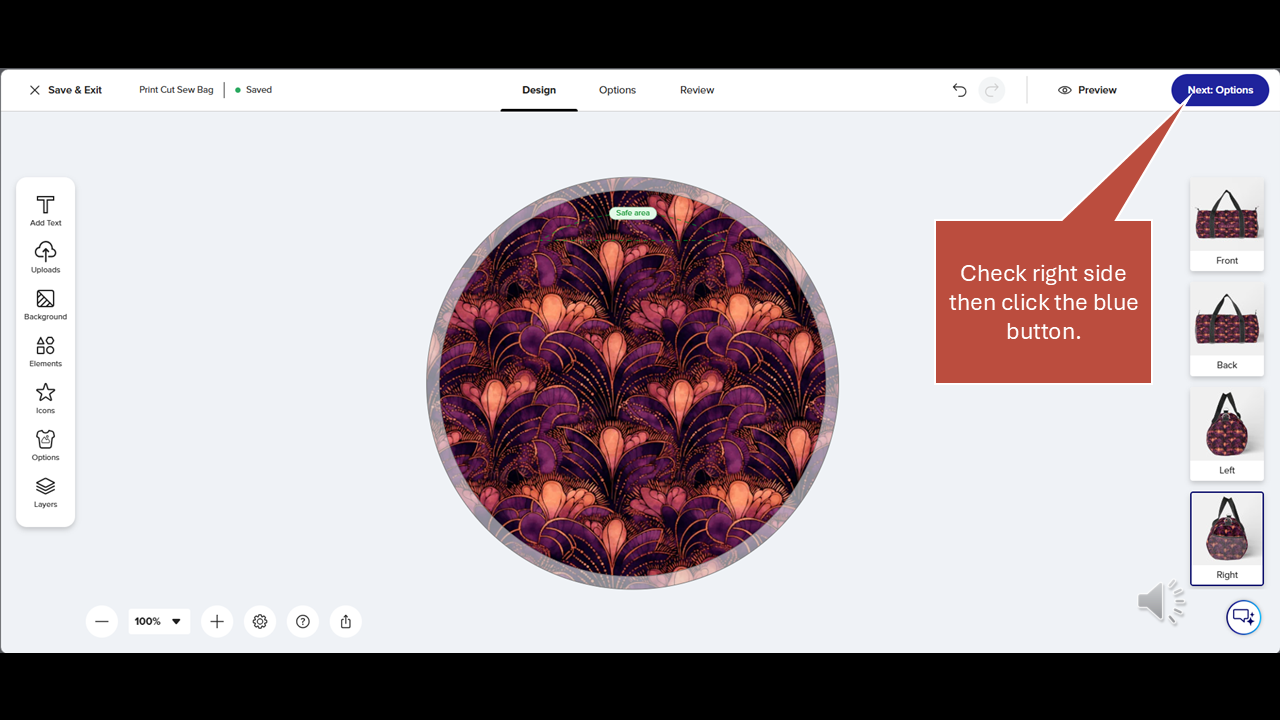
Step 33
Check the right side and then click the blue button again.
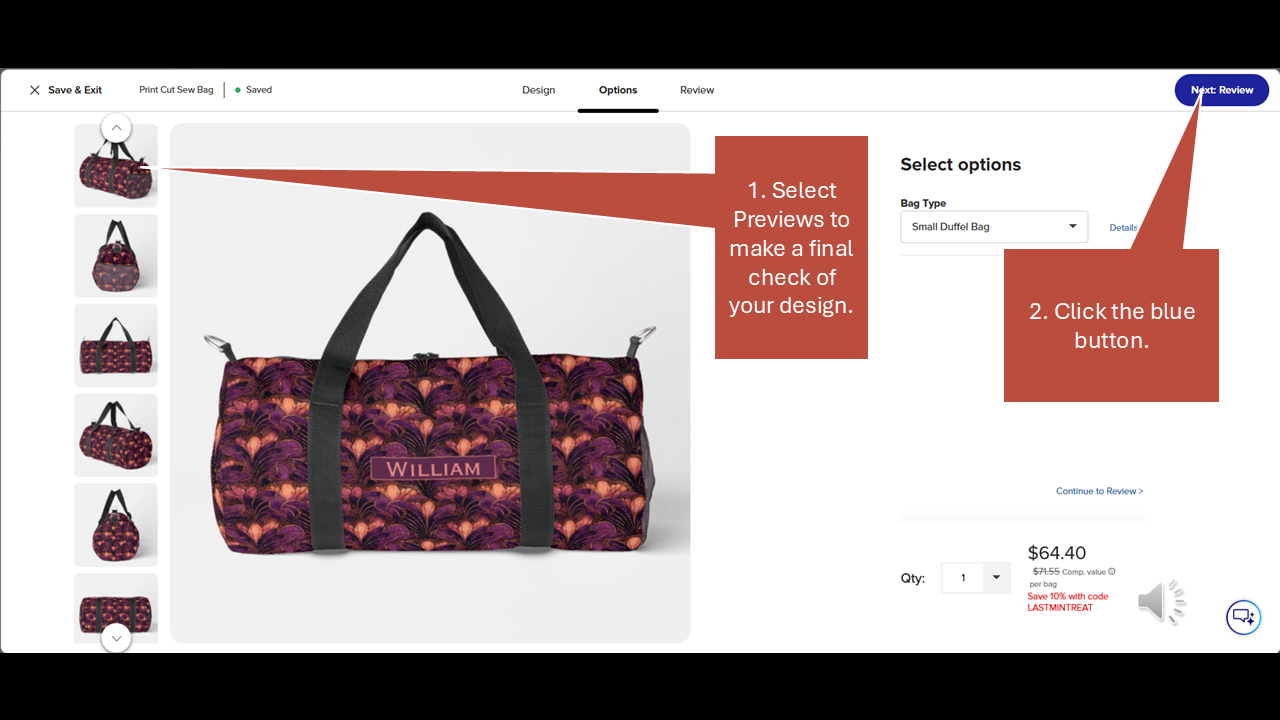
Step 34
Select the various previews on the left side of the screen to make a final check of your design. Then click the blue button in the upper right-hand corner one last time.
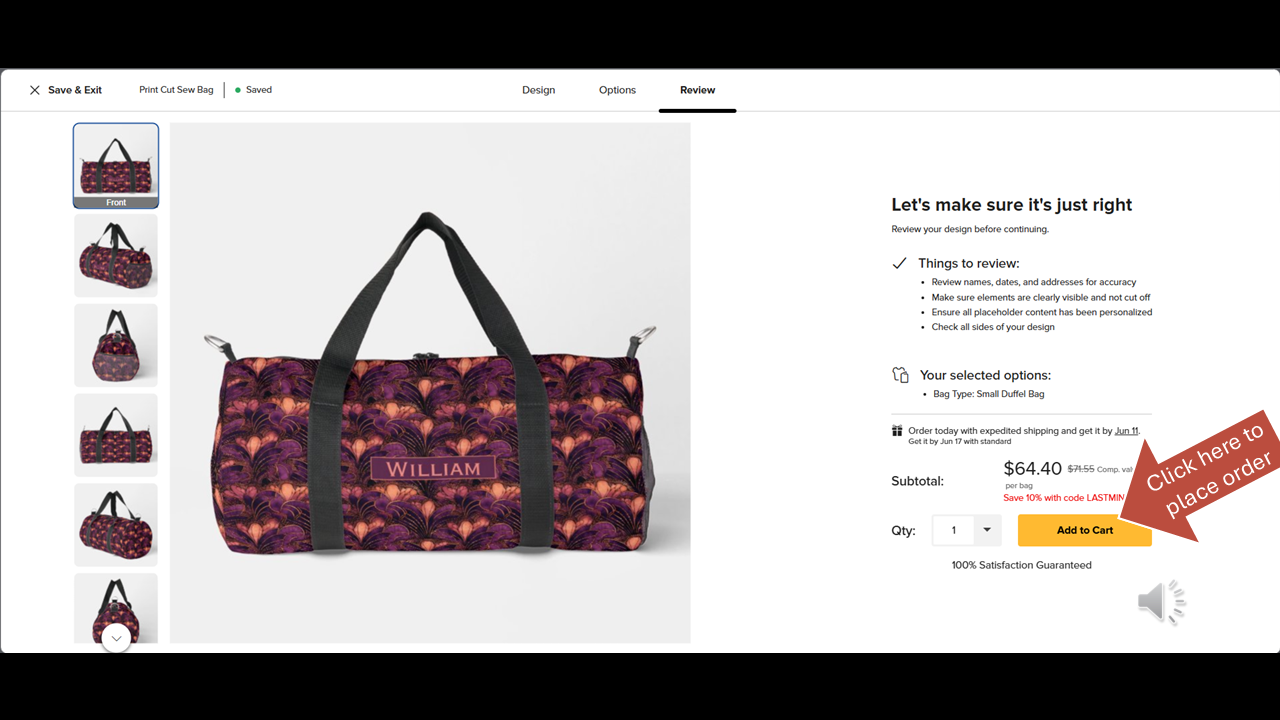
Step 35
Click Add to Cart to begin the order process.
More Info And Downloadable PDF
For more tips, visit the Personalize with Patterns blog.
To create your own personalized gifts, begin by finding a necktie pattern you like at MyTies.net and transferring its design to another product on Zazzle.
Download the PDF version of this step by step tutorial: